The Roomba is supposed to provide you with effortless cleaning. But that’s a far-fetched reality if your Roomba doesn’t charge.
So, why is your roomba not charging on dock?
Roomba won’t charge on the dock if the charging points are dirty or deformed. It won’t charge if the power supply isn’t 120-240 AC volts. It also won’t charge if the battery gets displaced or dead after long-term use. Software updates and physical damage to the device might also trigger this problem.
But, there’s more to it. So, keep on reading till the end to know all the details.
Roomba Not Charging On Dock- Reasons And Solutions
With a little maintenance, your Roomba shouldn’t cause you much trouble. But, over time, users complain about charging issues. Here, we’ve discussed some of the main reasons for Roomba not charging on the dock:
Reason 1: Charging Dock Can’t Supply Power
The Roomba gets its charge from the charging dock. So, if the charging dock is faulty, surely you’ll face charging issues. Over time the charging contacts of the dock build up dirt and debris. A disconnected power supply to the dock might also be the issue.
Solution: Ensure Power Supply And Clean Dirt
Here, ensure that the charging dock is properly connected to your power outlet. If it’s connected but the dock isn’t receiving power, try changing it to another outlet.
Roomba requires a 110-240V AC power supply. Ensure the power outlet you’re connecting the dock to provides this power. You can check it using a Multimeter.
Now, look if the charging contact has dirt build-up. Take a damp cloth and softly wash off the charging contacts if there is. Then, take another cloth or rag and dab some rubbing alcohol (90% or higher) on it. Gently rub the contacts with it until the contacts are clean.
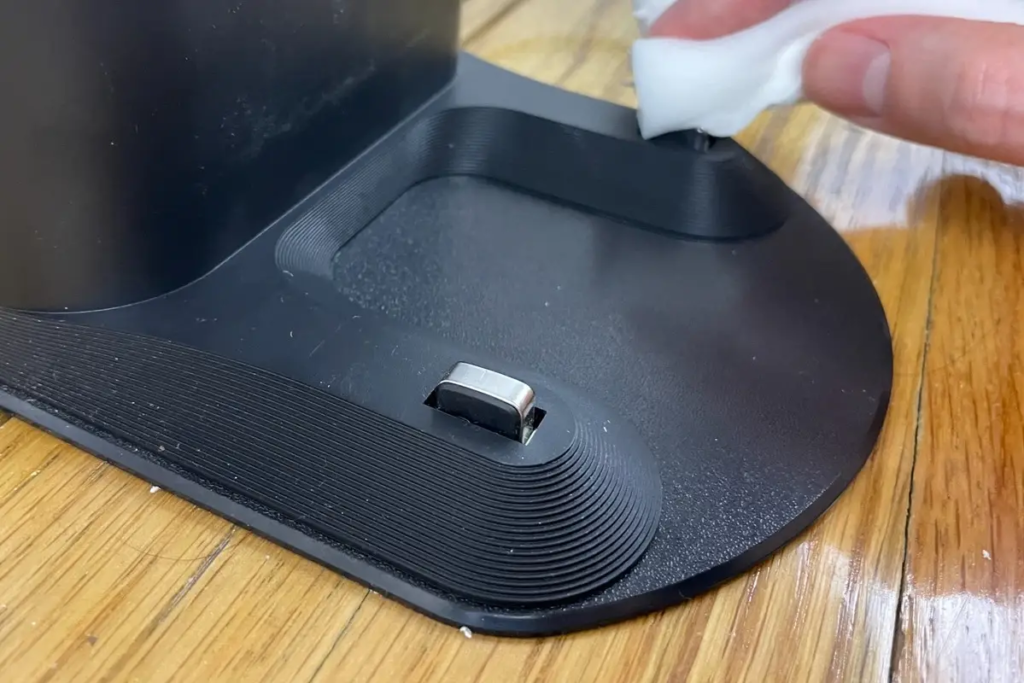
Here, also check the charging contacts of the Roomba. If it’s dirty, clean the contacts in the same way.
Reason 2: Deformed Charging Contact
Due to overheating, the contacts might get deformed. In that case, you’ll see melted plastic or the contacts will be pushed down. Thus, the Roomba won’t be able to charge.
Solution: Replace Charging Contact
If you can’t claim a warranty, replace the charging contacts yourself. Here, you can follow this procedure:
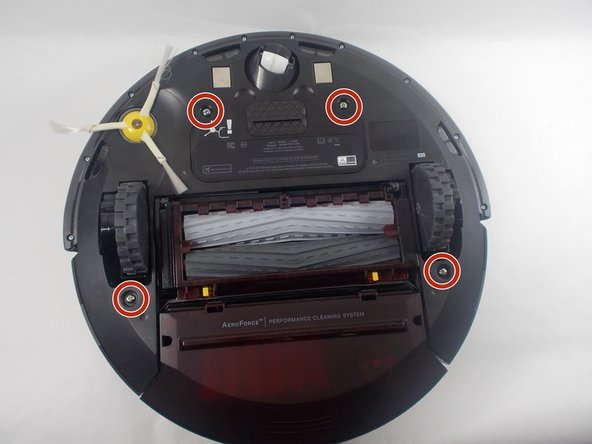
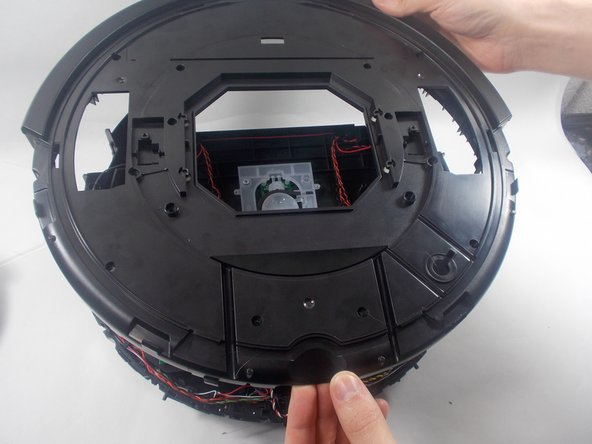
- Place the Roomba down and remove the two screws connecting the battery plate. Also, remove the two screws under the wheel. Then, remove the bottom plate of the Roomba.
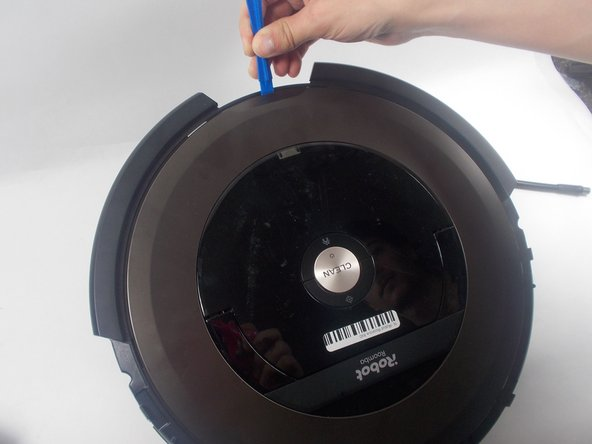
- Turn the Roomba face up and remove the dustbin by pressing the release button. Now, using an opening tool, remove the retaining band and face plate.
- Use a Phillips 1 screwdriver to remove the two handle screws and 14 plate screws. Then, lift the top plate up.
- Locate the charging contact wire and disconnect it from the motherboard by releasing the connector.
- Now, remove the four 9.3 mm bumper sensor screws. With that the charging contact backings will be exposed.
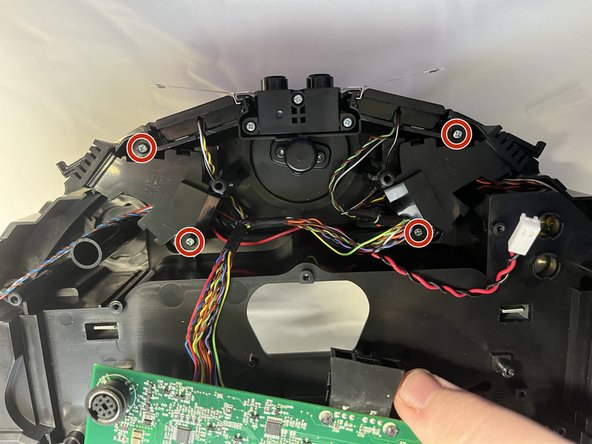
- Now, remove the two charging contact backings by removing the two 9.3 mm screws.
- Lastly, use an opening tool to pry out the contact points. Take your new ones and screw them back in. Put the whole vacuum together and you’ll be good.
This process is for the Roomba 890 model. However, the process should be similar even if you’ve another model.
Reason 3: Battery Issues
If the battery is displaced within the cleaner, it won’t receive the charge. Also, The battery might die over time from usage. Even if the Battery reads 16V charge while measuring, it might not hold a charge if it’s too old.
Faulty or overheated batteries are also some of the main reasons for Roomba 960 and 650 not charging.
Solution: Reinstall or Replace Battery
If the battery is displaced, simply reinstalling it properly should solve the problem. But, if the battery is bad, replace it. It’s a common problem after 2-3 years of continuous usage. Generally, these batteries have a lifespan of 300-400 cycles.
Remember if your Roomba used to go back to charging more frequently before this problem. If so, your battery must have died. Similar reasons are seen for Tineco ifloor 3 keeps shutting off. In some models, the Roomba will display error codes for failing batteries.
Follow this procedure to reinstall the battery properly:
- Turn your Roomba over and remove the Edge Sweeping Brush. Hold the brush steadily and remove the screw in the center. In some models, the battery is accessible without removing this screw. If so, you can skip this step.
- In some models, the battery cover can be removed by removing the two screws with it. In other models, you’ll have to unscrew all the screws of the bottom compartment.
- Remove the battery and clean the battery contacts with isopropyl alcohol (90% or higher).
- Now, clean the battery contacts on the Roomba. There are two types of contacts in Roomba: Tab contacts and Spring contacts. For tab contacts, use a melamine sponge. Also, gently bend the contact spot upward after cleaning.
For spring contacts, it’s best to use a toothbrush and a high concentration of isopropyl alcohol. Take your time and use light pressure to clean the contacts. Again, gently pull the contacts upward.
- Now, reinstall the battery and put everything back. If it still doesn’t work, reinstall with a new battery. Go for a genuine battery rather than an aftermarket one.
Reason 4: Software Not Up to Date
If you don’t have any hardware issues, your software needs an update. Although the Roomba has good software optimizations, developers try to find bugs. Then, a new software update is released.
Solution: Update Software
Here, the solution is to install the new software update.
Other than these, you can connect your Roomba to another charging dock. You can also connect the charge to another Roomba in your charging dock. This way you’ll know which part has the problem.
Reason 5: Dirty Wheels
You might wonder what dirty wheels have to do with charging. But, if the wheels get wrapped in hair or string-like substances, it forms an outer layer. This increases the height of the vacuum even by a little.
Thus, it doesn’t come in contact with the charging dock properly and fails to charge.
Solution: Clean Dirt From Wheels
Use your hands or a pair of scissors to cut off the string-like substances. If it’s stuck in between the wheels, use something thin and with a dull end to pull it out. Finally, wipe the dirt off with a damp cloth and you’re good to go.
Reset Roomba
If none of the above solutions work, try resetting your Roomba. The process is a bit different for different models. But generally, try pressing the Home, Spot Clean, and Clean buttons simultaneously until a light appears. Then, let go.
For the 600 and 800 series, keep pressing until you hear a beep sound. Your Roomba will be rebooted. If your problem still isn’t fixed, it might be due to internal physical damage. In that case, contact customer support for further assistance.
In some cases, your Roomba might charge and run. But, the vacuum brush might not spin.
Roomba Maintenance
Regular maintenance can keep your Roomba working for a long time without hassle. Once a week, be sure to clean the charging points as mentioned.
Also, clean the wheels as described. Make sure to clean the dustbin when it’s almost filled.
Frequently Asked Questions (FAQs):
Is it OK to run a Roomba daily?
Yes, it’s OK to run your Roomba daily. In fact, it’s suggested to do so if you have children, pets, and allergies.
How long does it take for Roomba to charge when dead?
It takes almost two hours for Roomba to charge when it’s dead. Although, here make sure you’re using an authentic iRobot Lithium ION/Nimh battery. Rather than aftermarket replacement parts, purchase from authorized dealers.
What is the disadvantage of using a Roomba?
The main disadvantage of using Roomba is inefficient cleaning. Normal vacuum cleaners can clean every corner of your home with higher suction power. But the Roomba or any other robot vacuum can’t clean nooks and corners likewise.
Conclusion
Hope you enjoyed reading our article about roomba not charging on dock. Still, we’d like you to know one last thing. Keeping your Roomba on the charging dock even after it’s fully charged is completely fine. It won’t harm your battery. Thank you!
We're an affiliate
We hope you love the products we recommend! Just so you know, CleanyHome.com is a participant in the Amazon Services LLC Associates Program, an affiliate advertising program designed to provide a means for sites to earn advertising fees by linking to Amazon.com.
![How to Get Rid of Spiders in the Basement [9 Effective Tips]](https://supercleanworldall.com/wp-content/uploads/2021/07/depositphotos_125531742-stock-illustration-the-pattern-with-spiders.jpg)